If you've ever applied to a high-end art show or craft fair, you've probably had to submit your work to a jury. Merideth Lacina, program assistant at the Illinois Artisans Program, recently spoke at a Chicago Craft Mafia networking event about how to make it through a jury process successfully and win a coveted spot at competitive shows. Read on for some of her insights as a jury member — and check out our Selling at Shows resource articles section for even more tips on successfully applying to shows.
Applying to a juried show or organization is often overwhelming. Are you choosing the right photos? Does your artist statement reflect your work? And what is the jury really looking for?
While there is no special formula to guarantee success, critically reviewing the process, your work, and your images can create a competitive application. Let’s break it down.


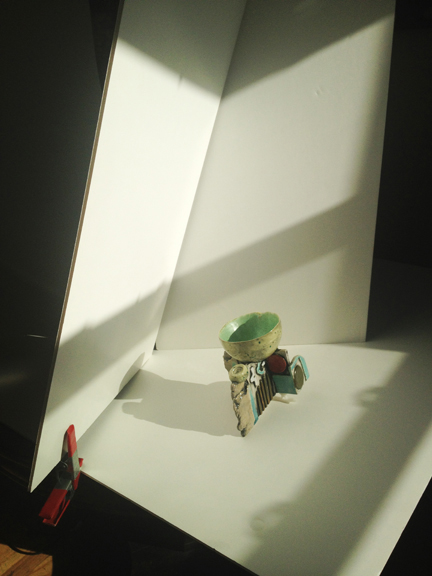
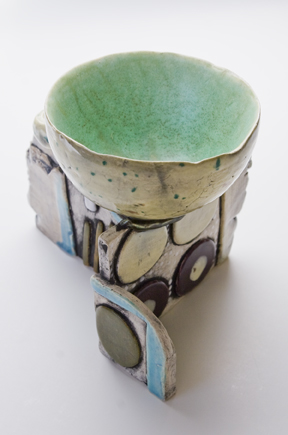
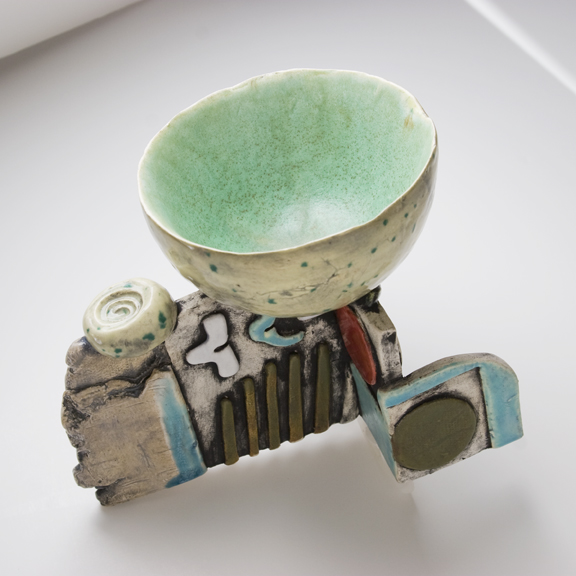
Having great, well-lit photos is essential for a successful jury application. Here, the photographer used a tabletop setup that bounces available light back onto the ceramic vessel that's being photographed. She then took the photos at different angles, with both vertical orientation and a more square crop. Photo credit: Ceramic Vessel: Zofia Tomala (Chicago, IL) Photographer: Merideth Lacina (Illinois Artisans Program)

How To Build an Artist Website
Sign up for our newsletter and get the book How to Build an Artist Website for free!
Researching the Organization
Applying to a jury should begin by researching which organizations will be a good fit for your art. Ask your peers or review resumes of artists you respect in the field. Once you identify a list of organizations, find their mission statements, visit their websites and social media pages on Facebook and Twitter, and, if possible, attend a show or gallery location. Review your work in light of that specific organization’s focus. If your work is similar, use the application to distinguish yourself. On the other hand, if you work is different, consider if it has the same audience base or fulfills the organization’s focus on new techniques or upcoming artists.
Breaking Down the Application
Start by reading through the entire application and making a checklist of required materials. Things to note: number and size of images, dates (postmark vs. delivery dates), requirements (residency, age, media); and the criteria for the work (one-of-a-kind, technique, production line).
In addition, pay attention to the jury selection. Juries of peers, professionals, show organizers, or shop staff each have a different focus and therefore will select different work. Also, work might be sorted and judged by media categories or in the order your completed application was received. So distinguish yourself and get your application in early!
The Importance of Your Images
The jury is often reviewing hundreds of applications and each slide is projected for three to 10 seconds. Images flip quickly, so be consistent with your horizontal or vertical orientation, color palette, and brightness, even if your work represents a broad range. The images should relate to each other and be in a sequence that makes sense, starting and ending strong. You will want to show range, but also a cohesive collection. Most juries are anonymous, so remove watermarks and your signature. Otherwise you may get a large black box placed over the edge of your image!
What Makes a Good Image?
Even if you hire a professional photographer, be critical of light, background, scale and composition. Daylight-balanced bulbs or sunlight filtered through tissue paper or curtains will give you a good natural color balance. Filtering softens the light, neutralizing reflections and shadows.
Choose images that show the detail of your work but have a pleasing composition to draw the viewer in. Remove all distracting objects from the background (lamps, cats or something brighter), especially in booth shots, when using a model, or showing your work in action.
Focus, focus, focus. Never submit a blurry image. Even if the camera says it is in focus, be sure. Start with a few sample shots and review the quality on a computer, not the back of the camera. You may notice distracting elements (dirt on your lens), a problematic highlight that obscures detail, or that you don’t have space to crop correctly.
If you are the photographer, consider buying a lighting kit, tripod, and neutral backdrop. To photograph a ceramic vessel by Chicago artist Zofia Tomala, a simple tabletop setup was used to produce a clean image. Foam core was clamped to a table to bounce daylight onto the vessel from all directions creating even light and a glow along the edge. The camera was on a tripod, and the vessel was photographed from several angles. While the vertical shot was stronger, the square composition made the cut, as the final product was a square pin.
A Few More Things to Keep In Mind
Write neatly, label all your materials with your name and address, and check your CD on another computer. Don’t be afraid to ask your colleagues for feedback. If you have applied to the organization before (even if you were accepted) show growth in your work; don’t send all the same images. Supplemental information (size, price, artist statement) is important to answer questions the jury may have and can sometimes determine the final vote.
What Happens Next?
Once you have finished your application, review it carefully and send it in. If you are accepted, congratulations! But your work is not done. Consider that you are building a relationship with that organization. If it is a shop or gallery, it is important to send new portfolios as your work develops.
If you were not accepted, asking for feedback can be humbling but also a great learning opportunity. Be courteous and keep an open mind. Then take that knowledge forward as you apply to the next opportunity.
Good luck!


